深度学习笔记
矩阵运算仿真神经网络
$$
x,输入;
y,输出;
w,权重;
b,偏差值.
$$
$$
y=activation(x*w+b)
$$
多层感知器
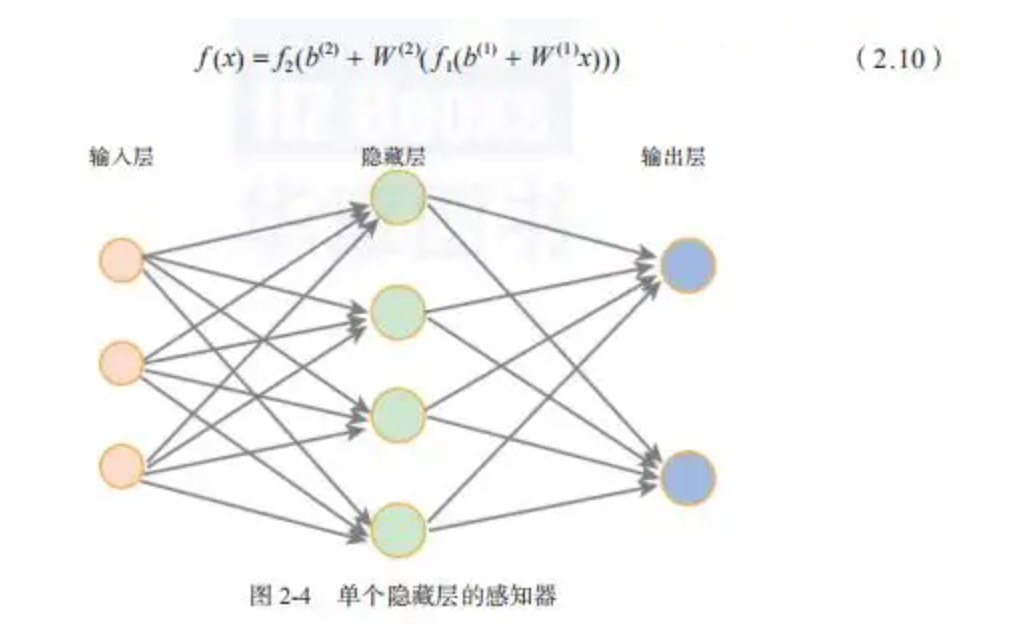
$$
h1=ReLU(x*w1+b1);
$$
$$
y=softmax(h1*w2+b2)
$$
深度学习必备软件安装
1 安装Anaconda
1.1 下载Anaconda
1 | https://www.anaconda.com/products/distribution |
安装时需要勾选add anaconda to my path
1.2 启动命令提示符
右击标题栏,可以改变文本与背景颜色
1.2.1 建立并切换工作目录
1 | md \pythonwork |
1.2.2 创建Anaconda虚拟环境
1 | conda create --name tensorflow python=3.5 anaconda |
conda create 建立虚拟环境
–name tensorflow –建立的虚拟环境名称为tensor flow
python=3.5 安装的python包版本为3.5
anaconda 在建立虚拟环境的同时也会安装其他的python包
中途按住y,即可继续安装
1.2.3 启动Anaconda虚拟环境
1 | activate tensorflow |
1.2.4 关闭Anaconda虚拟环境
1 | deactivate tensorflow |
2 在anaconda虚拟环境安装TensorFlow与Keras
启动Anaconda虚拟环境(注意全为小写)
1 | activate tensorflow |
安装TensorFlow CPU 版本
1 | pip install tensorFlow |
安装Keras
1 | pip install Keras |
3 启动Jupyter Notebook
建立并切换工作目录
1 | cd \pythonwork |
启动Anaconda虚拟环境
1 | activate tensorflow |
启动Jupyter Notebook
1 | Jupyter Notebook |
1 | pip install -i https://pypi.tuna.tsinghua.edu.cn/simple opencv-python |
输入
1 | import tensorflow as tf |
出错情况下应该这样处理,具体步骤如下:
1.必须保证在(base)与(anaconda)下输入
1 | conda list |
后都有tnsorflow出现
2.保证安装包与python版本一一对应
1 | conda config --add channels https://mirrors.tuna.tsinghua.edu.cn/anaconda/pkgs/free/ |
或
1 | conda install tensorflow |
2.10.0对应python3.10
离线版本下载:
1 | https://pypi.org/project/tensorflow/2.0.0/#files |
离线版本安装:
1 | pip install tensorflow-2.0.0-cp37-cp37m-win_amd64.whl |
显示版本
1 | print(tf.__version__) |
1 | import keras |
ctrl+C退出jupyter notebook网页
4 keras手写数字识别数据集
导入keras及其相关模块
1 | import numpy as np |
下载,读取,查看mnist数据
1 | (x_train_image, y_train_label), \ |
mnist数据集位置
1 | C:\Users\ZHANGCAIBIN\.keras\datasets |
4.1 查看单个训练数据的图像与标签
显示mnist的训练数据组成
1 | print ('x_train_image:',x_train_image.shape) |
定义函数以显示数字图像所对应的数字
1 | import matplotlib.pyplot as plt |
1 | plot_image(x_train_image[0]) |
1 | y_train_label[0] |
4.2 查看多个训练数据的图像与标签
导入pyplot模块
1 | import matplotlib.pyplot as plt |
定义函数
1 | def plot_images_labels_prediction(images,labels,prediction,idx,num=10): |
4.3 多层感知器模型数据预处理
4.3.1 image的features数据预处理
1.将28*28的图形reshape(一维化)为784长度,且为浮点型(float)
2.之后进行数字标准化。
查看image的shape
1 | print ('x_train_image:',x_train_image.shape) |
将image以reshape转换为一维向量,再以astype转为784个浮点数
1 | x_Train =x_train_image.reshape(60000, 784).astype('float32') |
查看转换为一维向量的shape
1 | print ('x_train:',x_Train.shape) |
查看第0张image图像的768个浮点数,每一个数字从0到255,表示图形每一个点的灰度的深浅
1 | x_train_image[0] |
将image数字标准化,以提高训练模型的准确率,因此除以255.
1 | x_Train_normalize = x_Train/ 255 |
查看image数字标准化结果
1 | x_Train_normalize[0] |
4.3.2 label数据预处理
label本对应0-9十位数字,选哟经过one-hot encoding(一位有效编码)转换为10个0或1的组合,eg. 数字7—-0000000100,即把第8(n-1)位改写为1
查看原本label标签字段,显示前5个
1 | y_train_label[:5] |
进行one-hot encoding 转换
1 | y_TrainOneHot = np_utils.to_categorical(y_train_label) |
查看转换后的label标签字段
1 | y_TrainOneHot[:5] |
5 keras多层感知器手写数字识别
步骤
数据预处理–建立模型–训练模型–评估模型准确率–进行预测